Interface
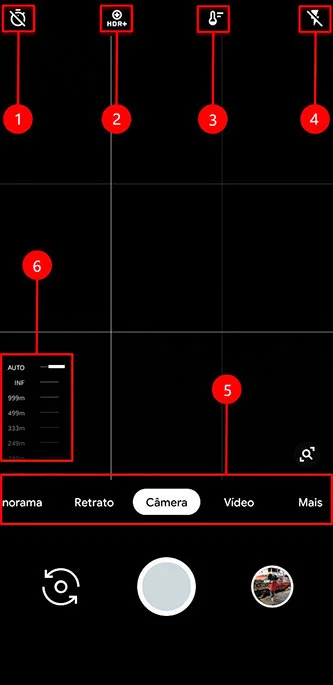
Above we have the main application interface, commonly known as viewfinder. We will explain according to the numbering of each item.
- Self-timer: Selects the time for auto photo shooting
- HDR Control: Selects HDR Off, HDR + Auto (ZSL), and HDR + Enhanced
- Temperature Control: Manually selects white balance control
- Flash: Enable, Disable, or Auto.
- Camera Modes
- Manual Focus Slider
Obs: Note: HDR marked Off is useless as it does not apply post processing from Google. Which brings no advantage.
Settings
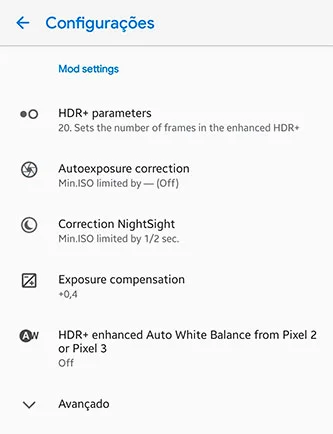
HDR+ Parameters
Here we can set the number of frames we want in the photos. The higher the number of frames, the longer it takes to take and process the photo. The advantage of using such high values as 20 to 30 frames is that it greatly reduces photo noise.
Auto Exposure Correction
It consists of controlling the shutter speed, in other words the speed at which the photo will be taken. But it does not work like a conventional manual mode. Ex: If I choose the speed of 1/20 if I have enough light in the picture to use speeds faster than 1/50. It will use the shutter at 1/50. If I have no light it will lock the shutter at the value I chose. in case 1/20.
- Advantages: You can make the fastest photo independent of the light
- Disadvantages: May cause photo noise if you do not choose the optimal speed for the light situation at the moment
If you don't know how to control it, just leave it on AUTO / OFF
Correction NightSight
It consists of controlling the shutter manually in Night Sight Mode. It works exactly the same as I explained in the previous item.
Exposure Compensation
It basically consists of determining the light compensation. this is. You know that circle when we click to focus and we can raise or lower the bar to make the picture lighter or darker. this is exactly what this function determines.
HDR+ Enhanced White Balance - AWB
This tool allows us to define how the white balance will be calculated. There are some alternatives for this function today. I particularly consider the alternatives as personal taste.
- OFF: Off
- Pixel 2: Tends to be a little more Magenta (reddish)
- Pixel 3: Use AI to identify scenes and find a better balance
- IMX: Controls WB (WhitheBalance) based on selected sensor
Advanced
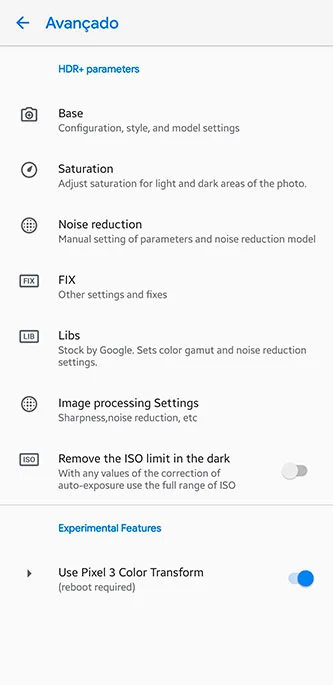
Base
It consists of determining which processing base and model you want to use in your configuration.
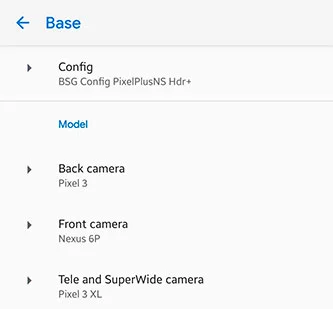
Settings
There are several processing modes and this is where you will determine which one to use.
We recommend
- Pixel 2018 ZSLR: Pixel 3 Processing
- BSG Config: Uses the same processing as night vision
Model
Determines the model of device you want it to clone in processing. It is a personal choice. Each one analyzes what pleases him most. There are some minor differences. insignificant in my view.
- Nexus 6P on the front panel tends to be sharper and correct some green spot problems. However, there are some devices that do not work on this Model Base, for example: Moto G6 / G7
Saturation
It consists of controlling saturation
- Highlights: High light saturation
- Shadows: Shadow Saturation
With this tool you determine the saturation level of both front and rear camera. The higher the value, the more saturated.
Noise Reduction
In this tool you control noise reduction. These are minimal changes. but directly interfere with the texture and sharpness of photos. There is no manual for this. If you do not know the subject. just leave the default value. In my Profiles (Official GB) all noise reduction values are changed. to get a better result.
Fix
In this menu you will fix most incompatibility issues.
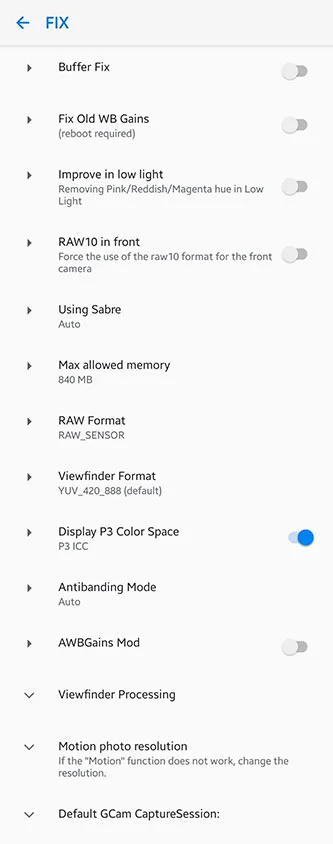
Let's detail just the most important
- Buffer Fix: Corrects the shooting problem in photos. if she starts shooting then stops the process midway and fixes viewfinder lags
- Improve in LowLight: Helps remove potential purple and green spots from photos.
- RAW10 in Front: Forces RAW10 in the front camera. required for Gcam to work on some devices like Mi8, Poco, Mix2S, Mix3.
- Saber - SuperZOOM: Even with Zoom photos do not lose resolution. Remember that resolution is just the size of the photo. and does not mean quality OK. although Gcam Zoom is great.
- Max Allowed Memorie: Memory allocated to the App. This will vary from your device's RAM. If you have 6 or 8 GB you can leave the maximum quiet.
RAW Format: Here you define which type of RAW the camera will use, this directly interferes with Gcam operation, by default the devices use RAW10. Except Samsung devices that use on RAW Sensor.
Viewfinder Format: Another item that defines the operation of Gcam. Here it is sorted by API level. You can check the API level through our app. GcamBrasil Clube in the side menu Check API2.
- API2 Level3: YUV (Virtually All)
- API2 Full: JPEG (Mi8, Poco, Mix2s, Mix3, RazerPhone)
Display Color P3: It consists of color capture, this mode was already used in iPhones and was included in Gcam below an example of the color capture amplitude of this format. sRGB and the conventional format. In short you can capture more colors. Of course the display needs to be compatible to notice the differences.

Continued Advanced Mode
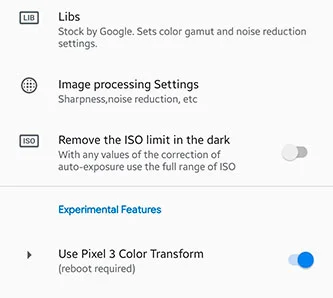
Libs
They are responsible for post processing of the image, some versions may contain several Libs. there is a comparison in our app's VipClube session
Image Processing Settings
Lib Fine Tuning, where you determine the level of sharpness and reduction of noise and artifacts in the image.
Remove ISO Limit in the Dark
Disabling the ISO limit may use higher values for sensor light sensitivity. may cause noise
Pixel 3 Color Transforming
Pixel 3 color rendering using AWB
Photo and Video Setup
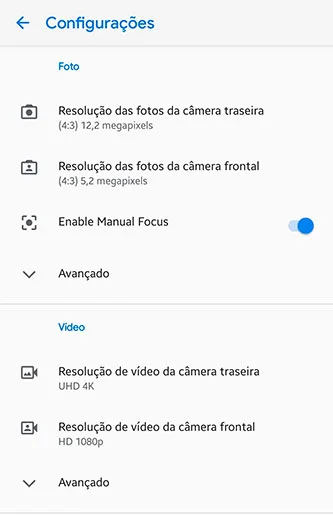
Setting the resolution of photos in their formats I recommend using 4: 3 which is the default and uses full sensor without crop.
Enabling Manual Focus - Enable Manual Focus
This is the side slider I showed in the first print. Not all versions of Gcam have this functionality. This is to control how far you want the focus to focus. Great for portraits and macro photography. Note: In HDR + Enhanced, after choosing the focus distance you need to touch the screen. for it to work. in HDR + Auto this is not necessary.
Advanced Photo
- Resampling Method: Here we have 3 options Raisr, Lancroz and None, I suggest leaving in Raisr which uses Google's artificial intelligence for a better blur clipping in portrait mode.
- Final JPEG Quality: Choosing the final JPEG quality by 100% will result in larger photos. usually 10MB 9MB each photo.
- HDR + Control: Enter a Toogle to define which stage you want to use. HDR + Off, Auto or Enhanced. as we saw on the main viewfinder screen.
Portrait
- Enhanced HDR +: Enables enhanced HDR + in portrait mode.
- Remove Zoom: Disables Portrait Mode Zoom
- Save To DCIM: Saves portraits in the same folder as normal photos without creating multiple folders
Night vision
- Alternative Config: Uses alternative for use on Android 8 devices
- Use Flash: Use Flash as auxiliary light in night mode
- Image Rotation: Corrected if your night mode is upside down
Others
- Slow Motion: SlowMotion FPS
- SlowMotion Toogle: Turns on and off
- Electronic Video Stabilization: Reduces camera shake in recorded videos
- Bitrate: Choose the amount of bitrates that will be used to record videos
- Efficient Storage: Uses H.265 / HVEC format for storage
- Enable 4K in Front Cam: Enables 4K recording on the front camera
Final considerations
These are the main configuration functions of Gcam. Knowing these concepts. You know how to configure any version. 6.1 and also 6.2.